In this tutorial we will see how to connect SQL Database to our WebForm page created in Visual Studio 2015. You will need SQL Server 2014 which you can download from here. The tutorial will include how to make a simple webform page and add textbox and buttons to it. And then apply database to it with CRED operations but we will only be checking insertion.
Now open Visual Studio and create a ASP.NET Web App in WEB section. Add a new web form to your project. If you do not know this previously you can follow my previous tutorial, How to create a beginner web form. Now what we want a is a view like this.


Now you need to right click on Databases and select New Database. Give it the name you want, for this example we will name it Test. Now under the Databases column on left, you can see your database Test. You now need to right click on it, select new and add a Table.


Now open Visual Studio and create a ASP.NET Web App in WEB section. Add a new web form to your project. If you do not know this previously you can follow my previous tutorial, How to create a beginner web form. Now what we want a is a view like this.

Now in order to do that, we will select Split view from the bottom on Visual Studio. Now you also able to see the code section behind your webform. You can see the textbox ID and the Button ID. We will use these Ids in order to receive data from the fields.
For textboxes to show text in the picture above, you add placeholder in textbox tag. Like this; <asp:TextBox ID="TextBox2" runat="server" placeholder="Enter Name"></asp:TextBox>
For button to show text in it we use Text in Button tag like this; <asp:Button ID="Button1" runat="server" Text="Submit" Width="128px" OnClick="Button1_Click" /. Width is an attribute to set the width of the button and OnClick is used to perform anything when it is clicked e.g. openning a new page or navigate to any other thing.
Add a label as well by drag n drop from toolbox. We will use it to display the message Submission Successful; <asp:Label ID="Label1" runat="server" ></asp:Label>
For cursor to appear on the first text field by default, you need to add the following attribute in the <form> tag below <body> tag in you aspx file. defaultfocus="TextBox1". This will now show the cursor blinking on the first textbox of your page.
Let us now take a look into the SQL Database connection. Open Microsft SQL Server Management Studio and connect to your localhost. You will have a view like this.


You will have a view where you can create your table. Add 5 fields as follows. Check Allow Nulls option for every row except for the id. Right click on id row you created and make it the primary key. You also need to go to column properties below and find the option Identity specification by scrolling down and check it from No to Yes. What this will do is to increment in your records by itself.

Now you need to come back to your Visual Studio and in the Toolbox options search for SqlDataSource. Now drag and drop it in your web form.

Now you need to Configure/Add Data Source. Click it. Select New Connection. You now need to give your server name under the Server Name label.

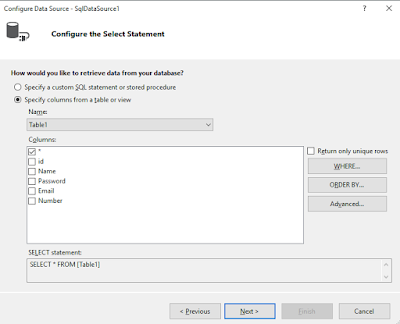
You need to select your table Test form the option Select or enter database name. You can also test your connection with the option provided below. Click next. Again Next until you come to the dialog box where you will configure the select statement. Here you can see the attributes of your table. From there you need to select the Advanced tab.
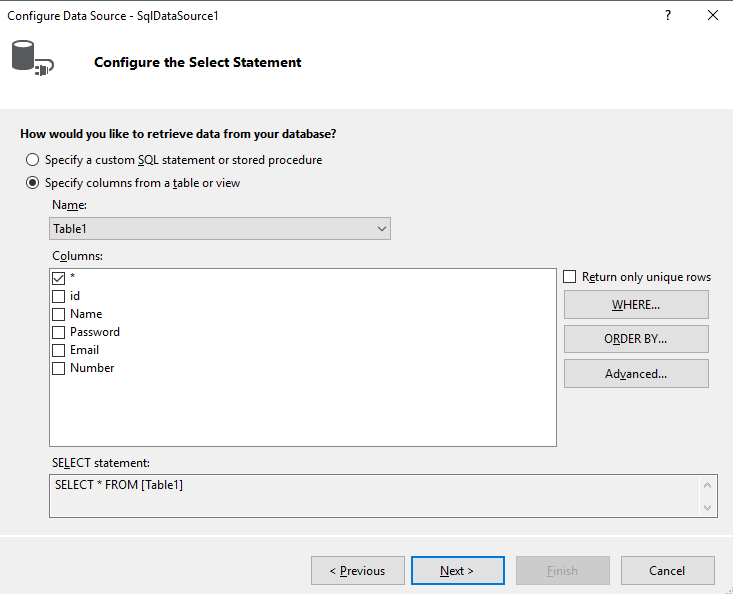
You need to check the both options like in the screenshot below. What this will do is write CRED operations for you and make your life easier.

Then you will be prompt to test your query, Select * form table1. Test it and finish. Now you need to make changes to your code. You will see that the CRED operations code is added to the .aspx file automatically. You need to comment the update and delete code as we will only be testing insertion. To comment a code you add <%-- in the start and till where you want to comment add --%>. In insertion code we will add Control ID. It will refer to the textbox and save data from it. Also, we will edit the Parameter identifier to ControlParameter.

Now your database is connected with your form. Only one thing left is to attachment with the button. For this we will double click on the button and it will automatically take us to the C# code file where we will be adding the following code.

You are all good to go now. Just hit the debug button and enter some data to your form and click the submit button. Your data is saved into the database you created. You can check this in your SQL Server Management Studio as well. You have now successfully learned how to attach SQL database to a web form. If there are still any quires, feel free to comment and ask. Happy learning!
Comments
Post a Comment